
Wait until it is safe to look
Let the storm pass and avoid wet ladders, unstable footing and damaged equipment. You do not need to climb onto the roof to start gathering useful information. Look from the ground for broken covers, hanging material or an obvious change around an opening. Inside the RV, check for new staining or damp areas. If the manufacturer does not clearly permit walking on the roof, stay off it and arrange an inspection instead of taking a risk.
Check openings as well as the roof surface
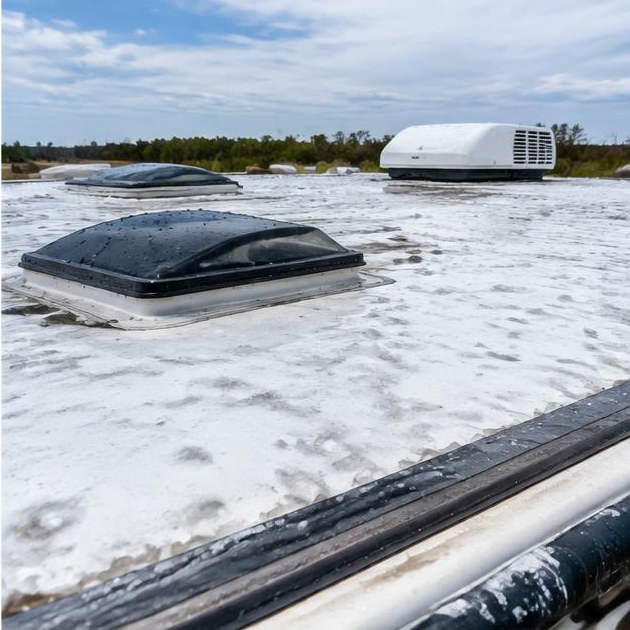
Vents, rooftop equipment, seams and caulking all deserve attention after a hail event. A roof may look broadly intact while a cover or seal at an opening has changed. Note what is different from before the storm. Photograph safely visible damage and avoid removing parts just to get a closer view. The location of an interior stain can help describe the concern, but water may travel before appearing inside, so do not assume the visible spot is the entry point.
Small changes deserve a closer inspection
A crack or lifted seal is worth checking even if the RV has not yet developed an obvious interior leak. The goal is to catch a possible opening early rather than wait for the next rain to test it. Do not apply a random sealant that may be incompatible with the roof material. Tell Robert about existing products, prior repair work and your roof type if you know them. If you do not know, provide the RV details instead of guessing.
Keep photographs and factual notes
Record when you noticed the damage and what you can actually see. Keep photos of the same areas from consistent viewpoints when it is safe. If you plan to ask an insurer about damage, contact the insurer directly for the requirements of your policy. Save the original image files and make a dated list of affected areas. Ask which documentation the adjuster needs before authorizing permanent repairs.
Use the free inspection as a starting point
R&C offers a free roof inspection focused on leaks, seals and caulking. Use the findings to prioritize damaged openings and identify areas needing closer attention. Robert explains what he finds and discusses any resealing or repair quote separately. If your trailer is parked at home in Moore after a storm, share access details and any new interior water signs. The inspection can happen where the RV sits, without beginning by towing it to a shop.
Build a storm photo sequence
Begin with wide views that identify the RV and the side or roof area being documented. Then capture safely accessible details without changing the damage. A sequence is easier to interpret than a folder of close-ups with no location reference. Include the condition of vent lids, skylights and visible exterior trim, along with interior marks that appeared after the storm. Do not lean from a ladder to reach a better camera angle. Save originals before cropping or adding arrows to copies. Older maintenance photos can establish what a particular seam looked like before the hail, but label their dates clearly. Use a simple record structure so later photographs can be compared without relying on memory.
- Name each photo group by date and general roof or interior area.
- Pair a close view with a wider image showing its location.
- Log new moisture separately from older discoloration or previous repairs.
Protect the interior without hiding the evidence
If water is entering, put personal safety ahead of collecting more pictures. Keep clear of wet electrical equipment and seek appropriate help for electrical isolation rather than touching damp fixtures or panels. Move dry belongings away from the affected area when that can be done safely. Catching drips may limit damage to furnishings, but it does not seal the entry point. Photograph the condition before moving items when circumstances allow, then record any temporary measures taken. Ask the insurer about required mitigation and documentation. Avoid fastening a cover through the roof or spreading an unknown coating over damaged areas. Temporary roof protection needs a method compatible with the construction and safe access; an approaching second storm is not a reason to climb onto slippery material.
Distinguish the roof membrane from its accessories
Hail can leave different evidence on flexible roofing, metal trim and brittle plastic covers. A broken skylight is a different repair problem from damage at a seam, even if both followed the same storm. Roof-mounted equipment also has covers and seals that should be assessed independently. A ground-level view may reveal a missing piece while concealing a fine crack or a change beneath an accessory flange. Conversely, a visible dent in trim does not identify the condition of every adjoining waterproof layer. Ask for findings by component rather than a single broad description of the entire roof. Knowing which material is damaged helps guide compatible repair choices. Keep track of earlier coatings or patches because they can affect surface preparation and the products appropriate for subsequent work.
Follow up through the next rainfall
Once the roof has been assessed or repaired, keep the inspection notes and establish a new interior baseline. Photograph ceiling panels and cabinet corners after they are dry so future changes are easier to recognize. During the next rain, observe from inside without exposing yourself to lightning or slippery exterior surfaces. Check the original stain and nearby areas, remembering that water can follow framing before it appears. A dry surface immediately after work is useful, but it is not a reason to ignore later discoloration, odor or soft material. Report any new evidence promptly with the date and weather conditions. Do not cover a persistent stain with finish material until the moisture source and affected construction have been evaluated. A repair record should remain useful beyond the insurance paperwork.